


Table of Contents
Welcome back to another informative article from WordPress Whispers, your trusted source for in-depth WordPress tutorials and insights. Today, we’re going to delve into a topic that’s been gaining a lot of traction in the WordPress community – using GraphQL with Headless WordPress.
For WordPress developers looking to elevate their projects, understanding how to leverage GraphQL in a headless WordPress environment can be a game-changer. GraphQL, a powerful query language for APIs, offers a more efficient alternative to REST APIs, enabling you to request specific data you need, and nothing more. When combined with the flexibility of a headless WordPress setup, where WordPress is used purely as a content management system with the frontend being handled by a different technology, the possibilities are truly exciting.
In this article, we’ll guide you through the process of setting up a headless WordPress environment and integrating GraphQL into it. We’ll cover everything from the basics of GraphQL and headless WordPress to step-by-step instructions on fetching and manipulating data using GraphQL. And yes, we’ll get our hands dirty with code, providing practical examples to help you understand the concepts better.
So, whether you’re looking to optimize your data fetching processes, reduce over-fetching and under-fetching issues, or simply want to explore new ways to enhance your WordPress projects, this article is for you.
Before we begin, here are some resources you may find helpful as we dive deeper:
WPGraphQL – A free, open-source WordPress plugin that provides an extendable GraphQL schema and API for any WordPress site.
Headless WordPress – An explanation of what Headless WordPress is and how it works.
GraphQL – The official website for GraphQL, providing a comprehensive understanding of what GraphQL is and how it works.
How to Build a Headless WordPress App With React and WPGraphQL – A practical guide on building a headless WordPress application with React and WPGraphQL.
Headless WordPress with GraphQL and SvelteKit – An interesting read on using GraphQL with headless WordPress and SvelteKit.
Understanding Headless WordPress
In web development, the term “Headless” refers to a backend system that’s decoupled from the frontend presentation layer. When we talk about Headless WordPress, we’re referring to using WordPress as a content management system (CMS) while the frontend is handled by a different technology, such as React, Vue, or Angular. This decoupling allows developers to leverage the robust content management capabilities of WordPress while using modern frontend technologies to deliver a rich user experience.
One of the key benefits of Headless WordPress is the flexibility it offers. Developers are not restricted by the traditional WordPress themes and can create highly interactive and dynamic user interfaces. It also allows for the creation of web applications that can consume WordPress content but aren’t tied to the WordPress frontend. This opens up a world of possibilities for creating mobile apps, static sites, and other digital experiences that can leverage the power of WordPress as a CMS.
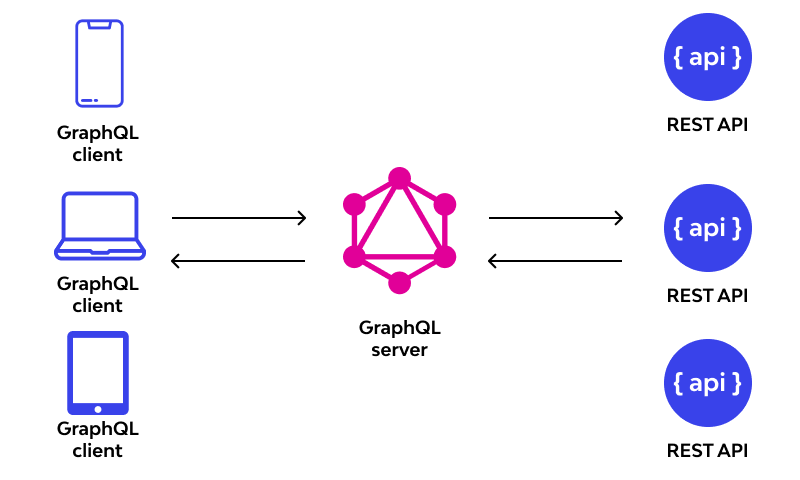
Headless WordPress works by providing an API, typically a REST API or GraphQL API, that frontend applications can use to fetch and manipulate data. In a traditional WordPress setup, when a user visits a page, WordPress generates the HTML for that page on the server-side. But in a headless setup, when a user visits a page, the frontend application makes an API call to WordPress to fetch the necessary data, and then it generates the page on the client-side.
Here’s a very simple example of how a headless WordPress setup might fetch a post:
fetch('https://your-wordpress-site.com/wp-json/wp/v2/posts/1')
  .then(response => response.json())
  .then(post => console.log(post));
In this example, we’re using the fetch method to make a GET request to the WordPress REST API, asking for the post with the ID of 1. The API returns the data for that post in JSON format, which we can then use in our frontend application.
Helpful resources regarding Headless WordPress:
Headless WordPress: The Ups And Downs Of Creating A Decoupled WordPress – A comprehensive article discussing the pros and cons of headless WordPress.
Andrew’s Vue.js with Headless WordPress App – An application built by WordPress Whispers author Andrew Hickman, utilizing Headless WordPress with a Vue.js front-end and the traditional WordPress REST API.
What Is Headless WordPress (And Do You Need It)? – An article explaining what headless WordPress is and when you might want to use it.
Headless WordPress Guide – A detailed guide on getting started with headless WordPress.
Headless WordPress with React – A tutorial on creating a headless WordPress site with React.
WP REST API – The official WordPress REST API documentation.
Introduction to GraphQL
GraphQL is a powerful query language for APIs that was developed by Facebook. Unlike traditional REST APIs, which require loading from multiple URLs as you fetch more complex data, GraphQL APIs get all the data your app needs in a single request. This efficiency is one of the key advantages of GraphQL and is particularly beneficial in a headless WordPress setup where minimizing data over-fetching and under-fetching is crucial.
GraphQL allows clients to define the structure of the data required, and the same structure of the data is returned from the server, therefore preventing excessively large amounts of data from being returned. But how does GraphQL work with WordPress?
Enter WPGraphQL, a free, open-source WordPress plugin that provides an extendable GraphQL schema and API for any WordPress site. WPGraphQL makes it possible to interact with your WordPress data in a more efficient and flexible way. You can query exactly what you need and nothing more, making it a great fit for headless WordPress setups.
Here’s a simple example of a GraphQL query using WPGraphQL:
{
  posts {
    nodes {
      title
      content
    }
  }
}
In this example, we’re asking for the title and content of all posts. The server will return a JSON object where these properties are available for each post.
Helpful resources regarding GraphQL and WordPress:
GraphQL – The official website for GraphQL, providing a comprehensive understanding of what GraphQL is and how it works.
WPGraphQL – The official website for the WPGraphQL plugin, with detailed documentation and tutorials.
A Gentle Introduction to GraphQL with WordPress and WPGraphQL – A beginner-friendly introduction to using GraphQL with WordPress and WPGraphQL.
GraphQL vs REST: What You Need to Know – A comparison of GraphQL and REST, discussing the advantages of GraphQL.
Using WPGraphQL with Advanced Custom Fields – A guide on how to use WPGraphQL with the Advanced Custom Fields plugin in WordPress.
Setting Up Headless WordPress
Setting up a headless WordPress site involves two main components: the WordPress backend and the frontend application. In this section, we’ll walk you through the steps to set up both.
Step 1: Install WordPress
The first step is to install WordPress. I personally recommend Local by Flywheel for an easy and seamless local development environment. For your live environments, I recommend Flywheel. They have free migrations from any environment and unparalleled 24/7 customer support. However, you may also use tools like MAMP or XAMPP to easily get started. If you’re new to WordPress, the official WordPress installation guide is a great resource.
Step 2: Install and Activate Necessary Plugins
Next, you’ll need to install and activate the necessary plugins. For this headless WordPress setup, the key plugin you need is WPGraphQL. This plugin will provide the GraphQL API that your frontend application will interact with.
To install WPGraphQL, navigate to your WordPress dashboard, then go to Plugins > Add New. Search for “WPGraphQL”, then click “Install Now” and “Activate”.
Step 3: Verify WPGraphQL Installation
After activating WPGraphQL, you can verify its installation by visiting yoursite.com/graphql (replace “yoursite.com” with your actual domain). You should see a GraphiQL IDE interface, which means WPGraphQL is working correctly.
Step 4: Prepare Your WordPress Data
This involves creating the posts, pages, and other content in the WordPress CMS that you’ll fetch from your frontend application.
Step 5: Set Up Your Frontend Application
The next step is to set up your frontend application. This could be a React, Vue, Angular, or any other JavaScript application. You’ll need to set up a development environment for your chosen technology, create your application, and then configure it to fetch data from your WordPress site using the WPGraphQL API.
Step 6: Fetch Data from WordPress in Your Frontend Application
Once your frontend application is set up, you can start fetching data from WordPress. You’ll do this by sending GraphQL queries to the WPGraphQL API and then using the returned data in your application.
Helpful resources for this topic:
WPGraphQL – The official website for the WPGraphQL plugin, with detailed documentation and tutorials.
Headless WordPress Guide – A detailed guide on getting started with headless WordPress.
How to Set Up a Headless WordPress Site – A step-by-step guide on setting up a headless WordPress site.
WordPress Installation Guide – The official WordPress installation guide.
Local by Flywheel – A local WordPress development tool.
Create a Headless WordPress Site With React – A tutorial on creating a headless WordPress site with React.
Building a Headless WordPress Site with Vue.js – A tutorial on creating a headless WordPress site with Vue.js.

Using GraphQL with Headless WordPress
Now that we’ve set up our headless WordPress site and installed the WPGraphQL plugin, it’s time to explore how GraphQL works with headless WordPress.
In a headless WordPress setup, GraphQL plays a crucial role in fetching and manipulating data. It allows your frontend application to make precise queries to your WordPress backend, asking for exactly the data it needs. This is a significant advantage over traditional REST APIs, where you often have to make multiple requests to different endpoints to gather all the data you need.
The WPGraphQL plugin is the bridge that connects GraphQL with WordPress. It extends the WordPress API to provide a GraphQL schema and endpoint, which your frontend application can interact with.
Here’s a step-by-step guide on how to use GraphQL to fetch and manipulate data from a headless WordPress site:
Step 1: Access the WPGraphQL Endpoint
The WPGraphQL endpoint is where your frontend application will send its GraphQL queries. By default, this endpoint is yoursite.com/graphql (replace “yoursite.com” with your actual domain).
Step 2: Write a GraphQL Query
Next, you’ll need to write a GraphQL query. This query specifies the data that you want to fetch from your WordPress backend. For example, to fetch the title and content of all posts, you would write:
{
  posts {
    nodes {
      title
      content
    }
  }
}
Step 3: Send the GraphQL Query
You can send the GraphQL query from your frontend application using an HTTP client like fetch or axios. The query is sent as a POST request to the WPGraphQL endpoint.
fetch('https://yoursite.com/graphql', {
  method: 'POST',
  headers: { 'Content-Type': 'application/json' },
  body: JSON.stringify({
    query: `
      {
        posts {
          nodes {
            title
            content
          }
        }
      }
    `
  }),
})
.then(res => res.json())
.then(res => console.log(res.data));
In this example, we’re sending the GraphQL query we wrote earlier to the WPGraphQL endpoint. The server responds with a JSON object containing the data we requested.
Helpful resources for integrating GraphQL with Headless WordPress:
WPGraphQL – The official website for the WPGraphQL plugin, with detailed documentation and tutorials.
A Gentle Introduction to GraphQL with WordPress and WPGraphQL – A beginner-friendly introduction to using GraphQL with WordPress and WPGraphQL.
GraphQL vs REST: What You Need to Know – A comparison of GraphQL and REST, discussing the advantages of GraphQL.
Using WPGraphQL with Advanced Custom Fields – A guide on how to use WPGraphQL with the Advanced Custom Fields plugin in WordPress.
Fetching Data from a GraphQL Server with JavaScript – A tutorial on how to fetch data from a GraphQL server using JavaScript.
Practical Examples
In this section, we’ll explore some practical examples of using GraphQL queries and mutations with a headless WordPress setup. We’ll discuss the code, its output, and how to troubleshoot some common issues.
Example 1: Fetching a List of Posts
Here’s a simple GraphQL query to fetch a list of posts:
{
  posts {
    nodes {
      id
      title
      content
    }
  }
}
This query requests the id, title, and content of all posts. When sent to the WPGraphQL endpoint, the server responds with a JSON object containing the requested data.
Example 2: Fetching a Single Post
To fetch a single post, you can use a query like this:
{
  post(id: "1") {
    id
    title
    content
  }
}
This query requests the id, title, and content of the post with the id of 1.
Example 3: Creating a New Post
Creating a new post requires a GraphQL mutation, which might look like this:
mutation {
  createPost(input: {title: "New Post", content: "This is a new post."}) {
    post {
      id
      title
      content
    }
  }
}
This mutation asks the server to create a new post with the title “New Post” and the content “This is a new post.” The server responds with the id, title, and content of the newly created post.
Sending the Correct Authorization Headers
When making requests that require authentication (like creating a post), you’ll need to send an Authorization header with your request. This header should include a valid JWT token, which you can obtain by logging in through the WordPress REST API.
Here’s an example of how to send a GraphQL mutation with the correct authorization headers using JavaScript’s fetch method:
fetch('https://yoursite.com/graphql', {
  method: 'POST',
  headers: {
    'Content-Type': 'application/json',
    'Authorization': 'Bearer ' + yourJWTToken
  },
  body: JSON.stringify({
    query: `
      mutation {
        createPost(input: {title: "New Post", content: "This is a new post."}) {
          post {
            id
            title
            content
          }
        }
      }
    `
  }),
})
.then(res => res.json())
.then(res => console.log(res.data));
In this example, replace yourJWTToken with your actual JWT token.
Common Issues and Troubleshooting
One common issue when using GraphQL with headless WordPress is receiving an error message like “Only authenticated users can access the WPGraphQL endpoint.” This usually means that you need to authenticate your GraphQL requests by sending an Authorization header with your requests, as shown above. WordPress Whispers’ article, Exploring User Authentication Methods in the WordPress REST API, can help you implement and troubleshoot various authentication methods.
Another common issue is receiving null or incomplete data in your responses. This could be due to various reasons, such as asking for data that doesn’t exist, or not having the necessary permissions to access the data. To troubleshoot this, check the errors field in the response, which will contain any errors that occurred while processing your query or mutation.
Exploring User Authentication Methods in the WordPress REST API: A WordPress Whispers guide to authenticating users in the WordPress REST API.
WPGraphQL Documentation: The official documentation for WPGraphQL, providing a comprehensive guide on how to use GraphQL with WordPress.
GraphQL.org: The official website for GraphQL, offering a wealth of resources including tutorials, community discussions, and in-depth explanations of queries and mutations.
JWT Authentication for WP REST API: A WordPress plugin that enables the generation of JWT tokens for authentication, which is crucial for sending authorized requests.
How to use GraphQL with WordPress: A detailed article on Smashing Magazine that provides a step-by-step guide on using GraphQL with WordPress.
Troubleshooting in GraphQL: A guide from Apollo GraphQL that provides tips on how to troubleshoot common issues encountered when working with GraphQL.
Headless WordPress with React and GraphQL: A practical guide that demonstrates how to set up a headless WordPress site with React and GraphQL, which can provide a real-world context to the examples discussed in this section.

Advanced Topics
Of course, as we delve deeper into the world of headless WordPress and GraphQL, we encounter more complex and intriguing concepts. Let’s explore a couple advanced topics like user authentication and creating custom endpoints.
User Authentication with JWT
User authentication is a crucial aspect of many web applications. In the context of headless WordPress and GraphQL, we often use JSON Web Tokens (JWT) for authentication. Here’s a basic example of how to authenticate a user:
fetch('https://yoursite.com/wp-json/jwt-auth/v1/token', {
  method: 'POST',
  headers: { 'Content-Type': 'application/json' },
  body: JSON.stringify({ username: 'yourUsername', password: 'yourPassword' }),
})
.then(res => res.json())
.then(data => console.log('Token:', data.token));
In this example, replace 'yourUsername' and 'yourPassword' with the user’s actual username and password. The server will respond with a JWT, which you can use for subsequent authenticated requests.
Creating Custom Endpoints with WPGraphQL
WPGraphQL allows you to create custom endpoints, which can be useful for adding custom functionality to your application. Here’s an example of how to create a custom endpoint:
add_action('graphql_register_types', function() {
  register_graphql_field('RootQuery', 'customEndpoint', [
    'type' => 'String',
    'resolve' => function() {
      return 'Hello, world!';
    },
  ]);
});
In this example, we’re adding a new field customEndpoint to the root query type. When you query { customEndpoint }, the server will respond with "Hello, world!".
Helpful Resources for these Advanced Topics:
WPGraphQL JWT Authentication – A WPGraphQL extension for JWT authentication.
JWT.io – A resource to learn more about JWT and its uses.
Adding Fields to the Schema – A guide on how to add custom fields to the WPGraphQL schema.
GraphQL Authorization with JWT – A tutorial on how to implement user authentication in GraphQL using JWT.
Custom Endpoints in WPGraphQL – A guide on creating custom endpoints in WPGraphQL.
Best Practices
When using GraphQL with headless WordPress, there are several best practices that can enhance your application’s performance, security, and maintainability. Let’s discuss some of these practices.
Performance Optimization
- Use Persistent Queries: Persistent queries can significantly improve the performance of your GraphQL server by reducing the size of the client-server payload and allowing the server to skip the query parsing and validation steps.
- Limit the Depth of Your Queries: Deeply nested queries can put a heavy load on your server. Consider setting a maximum depth for your queries to prevent this.
- Use Pagination: Instead of fetching all items at once, use pagination to fetch a limited number of items per request. This can reduce the load on your server and improve the response time of your queries.
Security
- Validate User Inputs: Always validate user inputs to prevent malicious data from entering your system. GraphQL schemas provide built-in validation, but you might need additional validation for complex inputs.
- Use Authorization and Authentication: Protect sensitive data by implementing proper authorization and authentication mechanisms. For example, you can use JWT for authentication and role-based access control for authorization.
- Handle Errors Gracefully: Don’t expose sensitive information in your error messages. Instead, log the detailed error information server-side and send a generic error message to the client.
Maintainability
- Structure Your Code: Organize your code into small, reusable components to make it easier to maintain and test.
- Use Descriptive Names: Use descriptive names for your types, fields, queries, and mutations to make your schema self-documenting.
- Keep Your Schema Up-to-Date: Regularly update your schema to reflect the current state of your data and business logic.
Helpful resources for these best practices:
GraphQL Best Practices – The official GraphQL documentation on best practices.
Security in GraphQL – A guide on how to run a secure GraphQL service by Apollo GraphQL.
Performance Tuning in GraphQL – A guide on how to optimize the performance of your GraphQL server.
Maintaining a GraphQL API – A tutorial on how to maintain a GraphQL API with Java.
JWT Authentication with GraphQL – A guide on how to implement JWT authentication in a GraphQL server with WPGraphQL.
Final Thoughts
We’ve embarked on an enlightening journey together, exploring the powerful combination of GraphQL and headless WordPress. From understanding the basics to diving into advanced topics, we’ve unlocked new ways to fetch and manipulate data, optimize performance, and enhance security in our WordPress applications.
The practical examples we’ve shared are your stepping stones to mastering GraphQL with headless WordPress. We’ve seen how to authenticate users, create custom endpoints, and troubleshoot common issues. But remember, this is just the beginning. The real adventure starts when you begin experimenting with these concepts in your own projects.
We know that every journey is unique, and we’re excited to hear about yours. What challenges did you overcome? What victories did you celebrate? Comment below, and let’s learn together! If you have questions or need further clarification, don’t hesitate to ask. Our community thrives on curiosity and collaboration.
Now, we have something special for you. Imagine having a comprehensive guide on Headless WordPress at your fingertips. A guide that demystifies complex concepts and provides practical examples. A guide that you can refer to anytime, anywhere.

That’s exactly what our eBook on Headless WordPress offers. And we’re giving it away for free to our subscribers.
But that’s not all. When you subscribe to WordPress Whispers, you join a vibrant community of WordPress enthusiasts and experts. You get the latest insights, tips, and tricks delivered straight to your inbox. You become part of a supportive network that’s as passionate about WordPress as you are.
So, are you ready to take your WordPress skills to the next level? Subscribe to WordPress Whispers today. It’s free, it’s enlightening, and it’s your gateway to mastering headless WordPress.


Great post !
Exactly what I needed to dive into headless WP.
Hi Thomas,
Thank you so much for your kind words! I’m thrilled to hear the article was exactly what you needed. If you have any questions or need more guidance as you dive into headless WordPress and GraphQL, please feel free to ask. I’d love to hear about your experiences and any results you achieve. Cheers!
Great tutorial, thanks Andrew! Have you used Gato GraphQL? Do you know how it compares with WPGraphQL? I use WPGarphQL, but it gets somewhat slow with over a dozen CPTs, so I wonder if to use Gato
Hi Roberto, so glad you found the tutorial helpful! I have not personally used Gato GraphQL, and it looks slick! I’ll give it a try, and let you know if I find any advantages.
Regarding WPGraphQL, it’s true that queries can become complex and slow, especially when dealing with several custom post types and complex data retrieval logic. I have an article in the works on how to optimize your WPGraphQL implementation strategies, to solve this problem efficiently. That’ll be coming out on May 16, and I’d love to hear your thoughts on it when it is published!
Thanks again for your support and kind words. Hope to see you around the community!