


Table of Contents
Welcome back to WordPress Whispers! I’ve been missing for a while for personal reasons, and I put some extra time into this special article to make it as pragmatic and hands-on as possible. Today, I’d like to visit a practical subject. We are diving into how to set up a basic headless WordPress site from scratch, using React for the front-end. This combination harnesses the flexibility of WordPress as a backend content management system with the power of React for a dynamic and responsive user interface.
WordPress: The Evolving CMS
WordPress, initially developed as a blogging platform, has significantly evolved to become a versatile Content Management System (CMS) capable of handling complex web applications. Its extensive plugin ecosystem and user-friendly interface have made it a preferred choice for developers and content creators alike.
The Rise of Headless WordPress
In recent years, the concept of “headless” WordPress has gained traction. This approach involves decoupling the frontend presentation layer from the backend WordPress CMS. Essentially, WordPress is used solely for managing content (backend), while the frontend is built using a different technology, such as React. This separation offers enhanced performance, security, and scalability while providing the flexibility to use modern frontend frameworks like React.
Why React?
React, a JavaScript library developed by Facebook, is renowned for building dynamic user interfaces. Its component-based architecture offers reusability and helps manage the UI’s state more efficiently, making it a perfect match for a headless WordPress setup.
Setting the Stage for Our Journey
My objective in this article is to guide you through the steps of setting up a headless WordPress site using React. We will cover the prerequisites, including the basic understanding of WordPress and React, and dive into how these two can be integrated seamlessly. We’ll explore setting up the WordPress site, developing the React application, and fetching data from WordPress. We’ll wrap things up by providing pointers on creating a dynamic front-end interface with React.
GitHub Repository
You can find all the files for this project in this GitHub repository.
In addition to following this practical guide, you can also view the repository’s README to quickly get up and running with your headless WordPress configuration.
Helpful Resources
As we progress, I’ll refer to some of the latest resources and guides that can assist you in this process. These articles are particularly useful for getting up and running with headless WordPress.
How to Use WordPress as a Headless CMS with React in 2024
How To Create a Headless WordPress Site With React.js
The New Way to Build WordPress Websites
What is Headless WordPress?
Headless WordPress marks a significant shift in web development, emphasizing a clear separation between the back-end content management (handled by WordPress) and the front-end user interface (managed by technologies like React). This approach is fundamentally different from traditional WordPress development, where the front-end and back-end are tightly coupled.
Understanding the Headless Concept
In a headless WordPress setup, WordPress is used purely as a content repository, accessible via the REST API. The front-end is developed independently using modern JavaScript frameworks like React. This architecture allows for utilizing WordPress’s powerful content management capabilities while leveraging the full potential of React for building interactive, dynamic user interfaces.
Advantages of Going Headless
- Performance Gains: React-driven front-ends can offer significantly faster user experiences. Unlike traditional WordPress themes, which often rely on server-side rendering, React can render content client-side, reducing server load and speeding up page load times.
- Enhanced Security: By decoupling the front-end, the WordPress admin area is kept separate from the public-facing site. This isolation can reduce the risk of security breaches, as the back-end is not directly exposed to end-users.
- Design and Development Flexibility: Developers are not constrained by the limitations of WordPress themes. With React, they can create more complex and tailored user experiences, taking advantage of React’s component-based architecture.
- Better Scalability: Headless WordPress sites can handle higher traffic and more complex interactions more efficiently than traditional setups. This scalability is particularly beneficial for large-scale applications and high-traffic websites.
Technical Considerations and Prerequisites
- Familiarity with REST API: A fundamental aspect of headless WordPress development is using the REST API to fetch and post data to and from WordPress.
- Understanding of React: Proficiency in React is crucial for building the front-end. This includes understanding its component-based architecture, state management, and lifecycle methods. Intermediate to advanced knowledge of the JavaScript programming language is necessary to write efficient React applications.
- Local Development Environment: Setting up a local environment, such as using XAMPP, MAMP, or Docker, is essential for developing and testing the headless setup. Personally, I recommend Local by Flywheel. You can easily install it on your machine and have a local WordPress site up and running in a matter of minutes, with no prior knowledge of Apache, MySQL, nginx, or related server technologies.
- Custom Theme or Plugin Development: Creating custom themes or plugins might be necessary, depending on the project’s requirements. This is especially true when adding custom endpoints to the WordPress REST API.

Preparing For Headless WordPress React Development
Preparing for a headless WordPress setup involves several key steps to ensure a smooth integration with React. Let’s review the key points before getting our hands dirty.
- WordPress Installation: The foundation of a headless WordPress setup is a standard WordPress installation. This serves as the backend where you’ll manage your content. I recommend using Local by Flywheel for a quick and easy local server.
- Understanding the WordPress REST API: The REST API is crucial in a headless setup. It enables the communication between your WordPress backend and the React frontend. Understanding how to use WP REST API endpoints efficiently is vital for fetching and posting data.
- Proficiency in React: Since React will be your frontend framework, a solid grasp of its principles, including component-based architecture and state management, is essential. Furthermore, to understand the principles of the React library, a solid understanding and familiarity with the JavaScript programming language is crucial.
- Up-to-date PHP Support: Keeping your PHP version up to date is critical for security and performance. As of 2024, WordPress has dropped support for older versions of PHP, aligning with modern web standards and best practices. Ensure that your hosting environment supports the latest PHP versions for optimal performance and security.
- Familiarity with Additional Tools and Frameworks: Besides the core technologies, familiarity with tools like WPGraphQL can enhance your headless setup. WPGraphQL is a plugin that converts your WordPress site into a GraphQL server, offering faster and more efficient data fetching compared to the traditional REST API. Learn more about how to use GraphQL with headless WordPress!
- Managed Headless WordPress Hosting: Considering a managed WordPress hosting provider like Flywheel, that supports the latest PHP versions and is equipped for headless WordPress deployments, can be beneficial. Flywheel offers optimized environments for headless setups, ensuring better performance and scalability.
- Integration with AI and ML Technologies: The future of headless WordPress also includes integration with AI and ML for advanced content personalization and intelligent data analysis. This integration can revolutionize how content is managed and delivered, providing more dynamic and personalized user experiences.
By following these guidelines, you can effectively prepare for a headless WordPress setup using React. Embracing these technologies not only ensures a modern and efficient web presence but also aligns with the latest trends and best practices in web development.

Setting Up the WordPress Backend
Setting up the WordPress backend for a headless configuration involves several important steps to ensure your site is optimized for both security and performance. Today, we are using Local by Flywheel to create and host our local server, due to its ease of use and minimal technical prerequisites. If you are using a different environment, such as XAMPP or MAMP, please refer to the documentation for your particular setup.
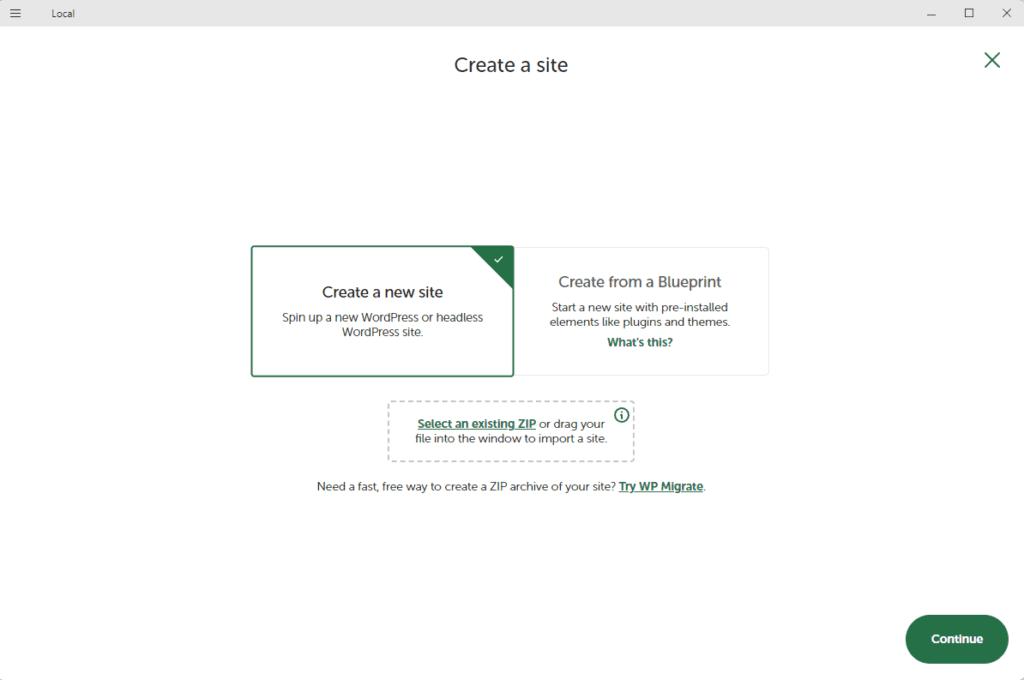
Install Local by Flywheel
- Download and install Local by Flywheel from its official website.
- Open Local and create a new site. This process involves specifying your site’s name and choosing the environment options.
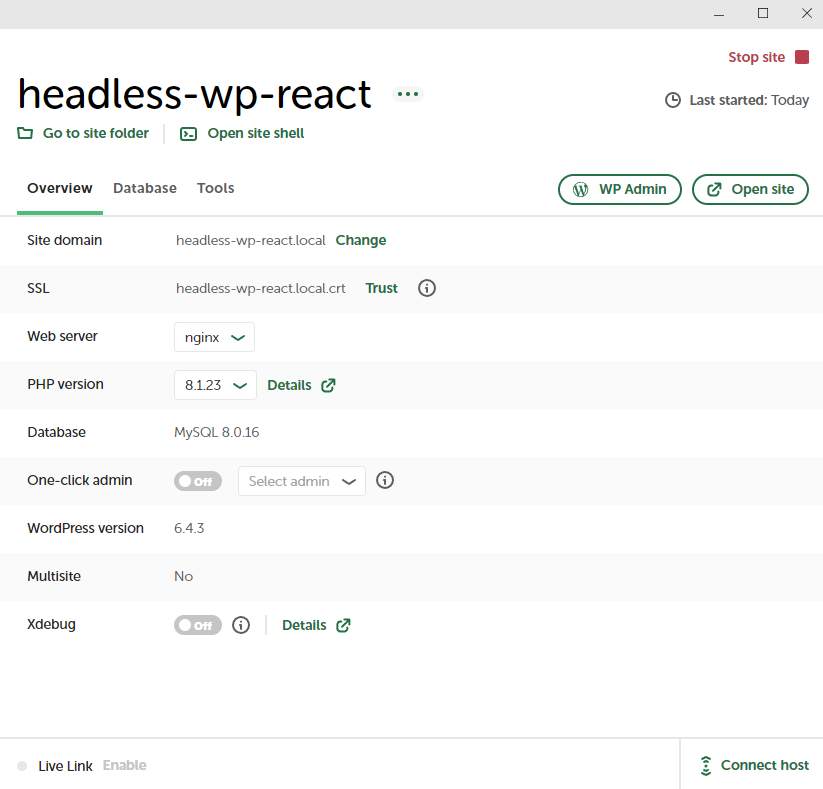
Setting Up WordPress
- Once the site is created in Local, WordPress will be automatically installed.
- Access the WordPress admin panel through Local’s dashboard to manage your site.
Configure WordPress for a Headless Setup
Disable the Front-end: To make WordPress headless, you can add a code snippet to your theme’s functions.php file that redirects visitors away from the front-end. Here’s a basic example:
add_action('template_redirect', function() {
   wp_redirect(home_url('/wp-admin'));
   exit;
});
Clean up the Backend: Remove unnecessary themes and plugins to streamline the WordPress backend for content management.
Customizing the WordPress REST API
- Access the WordPress REST API: This API is automatically available at
your-local-site.local/wp-json. - For custom endpoints, consider writing a plugin or adding functions to your theme’s
functions.php.
Optimizing for Performance
- Enable caching for REST API responses, either at the server level or by using WordPress plugins.
- Minimize the size of API responses by only returning necessary fields.
Regular Updates
- Keep your WordPress, PHP, and plugins updated through Local’s interface.
- Regularly check for updates in Local and apply them as needed.
By following these steps, you can effectively set up a robust and secure headless WordPress environment using Local by Flywheel, primed for integration with a React front-end. This setup provides a solid foundation for building a high-performance, scalable, and secure headless CMS.
Developing the Front-End with React
Now for the fun part (in my opinion): developing the front-end of your headless WordPress site! Here’s a step-by-step guide to help you integrate React with the WordPress REST API.
Setting Up a React Application
Start by installing Node.js and npm on your computer if you haven’t already.
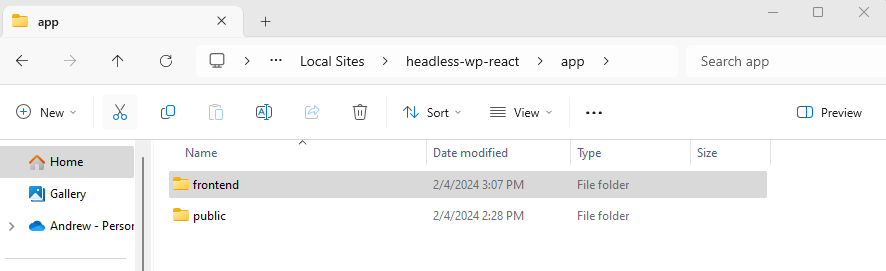
Create a new React application using Create React App. Remember, this is completely decoupled from the WordPress back-end, so you can create it anywhere. I personally like to put it in the app directory, as a sibling of the public directory that holds the WordPress installation serving as my back-end.
Open your terminal, navigate to your preferred directory, and run: npx create-react-app frontend
Navigate into your project directory with cd frontend and start the development server using npm start. If all went well, your React app should be running on localhost:3000.
At this point, you should have two servers running. Local, with your WordPress installation, and your Create React App development server.
Integrating React with the WP REST API
Install Axios, a popular promise-based HTTP client, for making API requests. Run npm install axios in your frontend directory.
Utilize Axios to fetch data from your WordPress site. As an example, we are going to display the post titles and content of the blog posts on our local WordPress installation.
First, open the frontend directory in your preferred text editor or IDE. I am using Visual Studio Code.
Then, let’s create a new React component that will fetch and display our blog posts.
In src, create a new directory called Components. Then create a new file in Components called BlogPosts.js.
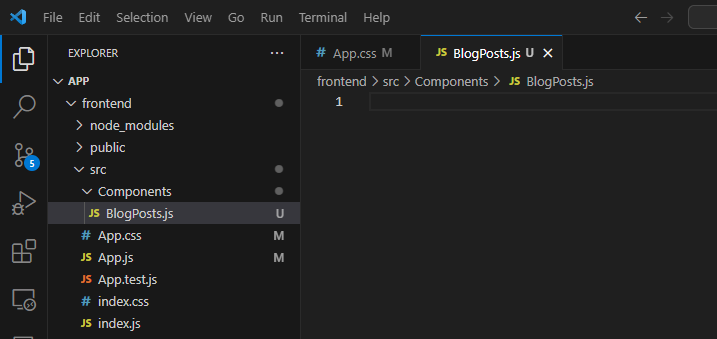
Paste this code into BlogPosts.js:
import React, { useState, useEffect } from 'react';
import axios from 'axios';

const BlogPosts = () => {
  const [posts, setPosts] = useState([]);
  const [error, setError] = useState(null);

  useEffect(() => {
    axios.get(`http://your-local-site.local/wp-json/wp/v2/posts`)
      .then(response => {
        setPosts(response.data);
      })
      .catch(error => {
        console.error('Fetching posts failed:', error);
        setError(error);
      });
  }, []);

  if (error) {
    return <div>Error: {error.message}</div>;
  }

  return (
    <div>
      {posts.map(post => (
        <div key={post.id}>
          <h2 dangerouslySetInnerHTML={{ __html: post.title.rendered }} />
          <div dangerouslySetInnerHTML={{ __html: post.content.rendered }} />
        </div>
      ))}
    </div>
  );
};

export default BlogPosts;
Please note that explaining the intricacies of this code is outside the scope of this article. Please consult the React documentation and the WP REST API Handbook to learn more about building efficient React components with WordPress endpoints. Essentially, this creates a React component that utilizes the Axios library to receive and render the posts from the REST API of your WordPress installation.
Lastly, let’s update our main App component to remove the default React app styles and render the new component.
In src/app.js, remove the import statements for the logo and stylesheet. Then, update the render output to include the new BlogPosts component. Here is a simple example:
import BlogPosts from './Components/BlogPosts';

function App() {
  return (
    <div className="App">
      <header className="App-header">
        <h1>Blog Posts</h1>
      </header>
      <BlogPosts />
    </div>
  );
}

export default App;
That’s all! You can now restart your React app in your terminal by pressing CTRL+C. Start it again by running npm start. Your app should now look like this, displaying the post titles and post content from your WordPress site:

Pretty awesome, right? You’re React application is completely decoupled from the WordPress site! You can use the WordPress CMS and REST API to manage data, and build the React front-end however you like. Test this example out by adding a new post or editing a current one!
Best Practices for Building React Components
- Ensure your components are reusable and maintainable. Break down your UI into small, functional components.
- Manage state and side-effects efficiently using hooks like
useStateanduseEffect. - For responsive design, consider using CSS frameworks like Bootstrap or Material-UI, or write custom responsive CSS.
- Perform data fetching in lifecycle methods (for class components) or hooks (for functional components) to ensure data is available when the component renders.
- Handle loading states and errors gracefully to enhance user experience.
Optimizing Components for WordPress Data
- When fetching data from WordPress, selectively query only the fields you need to minimize payload size and improve loading times.
- Use the
keyprop effectively when rendering lists of components to help React identify which items have changed, are added, or are removed.
From here, you can build a robust, efficient, and interactive front-end for your headless WordPress site using React. This setup not only provides a dynamic user experience but also leverages the powerful content management capabilities of WordPress.
Enhancing Your Headless WordPress React App with AI and Machine Learning
These days, using WordPress as a headless CMS can significantly boost user engagement and provide a more personalized experience. Here are a few ideas on how you can integrate these advanced technologies effectively.
- Personalized Content Delivery: AI algorithms can analyze user data to deliver personalized content. By understanding user behavior and preferences, your React frontend can display content that’s more likely to engage and retain your audience.
- AI-Driven User Experience Optimization: Utilize AI to analyze user interaction patterns to optimize the UI/UX. This can include adjustments to the layout, content placement, and navigation based on data-driven insights, ensuring a more intuitive user experience.
- Intelligent Search and Recommendations: Implement AI-powered search and recommendation systems. These can provide users with more relevant search results and product or content recommendations, enhancing the overall user interaction on your site.
- Chatbots for Enhanced Interaction: Incorporating AI-powered chatbots can improve user engagement by providing instant responses to queries. This is especially beneficial for handling basic customer service inquiries, freeing up human resources for more complex tasks.
- Security Enhancements: Use AI and ML for advanced security protocols. This can include anomaly detection to identify and mitigate potential security threats, ensuring the safety and integrity of your site.
When integrating AI and ML into your headless WordPress site, it’s essential to balance these technologies with human oversight. AI can provide powerful tools for optimization and personalization, but they should be used to complement, not replace, the human elements of creativity and decision-making.

Best Practices for Building Applications with Headless WordPress and React
When developing the front-end of a headless WordPress site with React, it’s crucial to focus on best practices that ensure web accessibility, inclusivity, and sustainable, performance-focused development. Here are some key practices to consider:
- Web Accessibility and Inclusivity:
- Ensure your React components are accessible to all users, including those with disabilities. This includes semantic HTML, proper use of ARIA roles, and keyboard navigability.
- Test your website with accessibility tools to identify and fix any issues. Tools like axe or Lighthouse can be integrated into your development workflow.
- Performance Optimization:
- Leverage performance optimization techniques like lazy loading of images and components, code splitting, and efficient state management in React.
- Minimize the number of requests to the WordPress REST API and optimize data fetching. You can use caching mechanisms to reduce load times and server strain.
- Using Advanced Custom Fields (ACF) with REST API:
- If you’re using Advanced Custom Fields in WordPress, the ACF to REST API plugin can help expose your ACF data through the REST API. This allows for seamless integration of custom fields with your React front-end. On newer versions of ACF, the REST API support is enabled by default, so you should not require this plugin.
- Ensure to select the “Show in REST API” option in your ACF field groups to make them accessible via the API.
- Building and Styling React Components:
- Develop reusable React components for different types of content like blog posts, pages, etc. This not only makes your codebase more manageable but also aligns with React’s component-based architecture.
- For styling, consider using CSS-in-JS libraries like Styled Components, or traditional CSS and CSS preprocessors.
- Implementing Routing and Navigation:
- Utilize React Router for client-side routing to manage navigation in your single-page application.
- Dynamically render components based on the URL, enhancing the user experience and site’s scalability.
- Fetching Data from WordPress API with React:
- Use Axios or
fetchto make HTTP requests to the WordPress API. Handle the data fetching in React’s useEffect hook to retrieve content like posts and pages from WordPress. - Properly handle loading states and errors to enhance the overall user experience.
- Use Axios or
- Deployment and Hosting:
- Choose a headless WordPress hosting solution that supports React and headless WordPress. I highly recommend Flywheel for managed hosting and exceptional customer support.
- Use continuous integration and deployment pipelines for efficient and automated deployment processes.
By following these practices, you can create a robust, accessible, and high-performing headless WordPress site with React, ensuring a seamless and engaging user experience.

Final Thoughts
As we conclude this guide to setting up a headless WordPress site with React, let’s recap the key steps:
WordPress Setup: Install WordPress to serve as a robust backend content management system.
Headless Configuration: Configure WordPress to operate in a headless manner, ensuring that the front-end and back-end are properly decoupled.
React Application Development: Establish a React application for the front-end, integrating it with WordPress via the REST API to fetch and display content.
Performance and Accessibility: Focus on creating efficient, responsive React components and prioritize web accessibility to ensure inclusivity.
Ongoing Adaptation: Keep pace with evolving web development trends, experimenting with new technologies and approaches to enhance your site.
In the dynamic and rapidly changing landscape of web development, embracing a headless architecture with WordPress and React not only aligns with modern practices but also opens up new realms of creativity and efficiency.
GitHub Repository
You can clone the repository for this project and get up and running quickly here: https://github.com/jsbard/headless-wordpress-react/
A Special Invitation from WordPress Whispers
For those eager to dive deeper into the world of WordPress and React, WordPress Whispers invites you to join our community. By subscribing, you’ll gain access to our exclusive LinkedIn group, weekly insights delivered straight to your inbox, and early access to future courses.
Additionally, you will receive our exclusive eBook on Headless WordPress, a comprehensive guide valued at $49.99, absolutely free. This resource is packed with insights and tips to help you navigate and excel in the headless WordPress landscape.
Don’t miss out on this opportunity to enhance your skills and stay at the forefront of web development trends. Subscribe now and embark on a journey of learning and growth with WordPress Whispers!


Pingback: WooCommerce Versions: Adapting to the Latest API Updates